
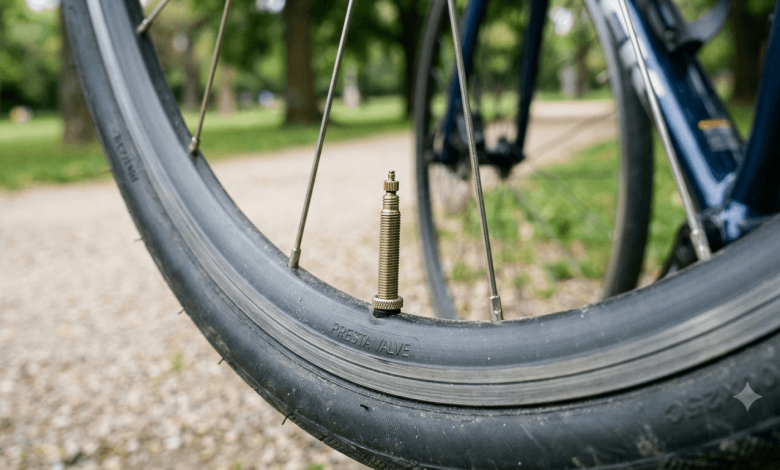
You’re standing at your bike, pump in hand, staring at this thin, unfamiliar valve on your tire. It looks nothing like the chunky valve on your car. You have no idea how to attach the pump, whether you need to unscrew something first, or if you’re about to puncture your tire. Sound familiar? Welcome to the world of presta valves — and you’re definitely not alone in finding them confusing at first.
Presta valves are the standard on high-performance bikes, road bikes, and most modern bicycles. They’re smaller and lighter than their Schrader cousins, which makes them the go-to choice for riders who care about weight and precision. Their streamlined design does come with a bit of a learning curve, but once you understand how they work, you’ll see exactly why cyclists prefer them.
This guide walks you through everything you need to know about presta valves — how they function, and how to pump them up without damaging your tire. By the end, you’ll feel completely confident handling them.
What Is a Presta Valve?
A presta valve is a narrow, elongated valve found on bicycle tires, most commonly on road bikes, gravel bikes, and premium mountain bikes. It’s sometimes called a French valve, since it was invented in France and remains the standard in European cycling.
The valve itself is fairly simple: a thin metal tube that screws into your rim and uses an internal spring-loaded mechanism to let air in and keep it in. Unlike Schrader valves — the chunky ones on car tires — presta valves don’t rely on air pressure alone to stay sealed. Instead, they have a small locking nut at the top that you unscrew before pumping air in.
The key difference comes down to this: a presta valve is a check valve. Air can only move in one direction unless you manually open it. That design is lighter, smaller, and more precise, which is exactly why serious cyclists prefer them. If you own a road bike, it probably came with presta valves as standard equipment.
How Does a Presta Valve Work?
Understanding the mechanics helps you use it without second-guessing yourself. Here’s what’s actually happening inside:
Look closely at a presta valve and you’ll notice a thin rod running down the center. That rod sits under spring tension. When you press down on it, you break the seal and allow air to escape or enter. Release it, and the rod snaps back into place, re-sealing the valve.
At the base of the rod is a small locking nut, sometimes called a locknut. Unscrewing this nut before pumping is what unlocks the check mechanism, letting your pump deliver air into the tire. Once you’re done, screwing the nut back down seals the valve again.
Here’s the part that trips people up: if you don’t unscrew that locking nut before pumping, your pump won’t attach properly, or you’ll end up forcing air into the valve stem instead of the tire. It’s one of the most common mistakes beginners make.
The valve only opens when pressure is applied to that center rod. Remove the pressure — by disconnecting your pump — and the spring pushes the rod back down, sealing the valve on its own. That spring-loaded design is exactly what makes presta valves reliable, and why they don’t leak air the way a damaged Schrader valve might.
Presta Valve vs. Schrader Valve: What’s the Difference?
Most people encounter Schrader valves first, since they’re standard on car tires. Understanding the differences makes it clear why presta valves are preferred on bikes.
A Schrader valve, named after the company that invented it, is thick and blocky. It relies on air pressure inside the tire to stay sealed. You attach a pump, the pump applies pressure, and it forces air past a spring-loaded ball inside the valve. Schrader valves hold air reasonably well, but they’re heavier and bulkier than presta valves.
Presta valves, by contrast, are sleek and lightweight, using that center-rod mechanism instead. Rather than relying on internal air pressure, a spring actively keeps them closed, which means they’re less likely to leak air over time even as your tire pressure fluctuates.
There’s another practical difference: presta valves need a narrower hole in your rim, around 6.5mm, while Schrader valves need a larger hole, around 8 to 8.5mm. That matters because you can’t easily swap valve types on the same bike without potentially damaging your rim.
Presta valves are also pressure-rated higher. The good ones handle 100+ PSI comfortably, which is why they’re standard on road bikes where tire pressure really matters. Schrader valves can handle high pressure too, but they don’t perform as well at those levels.
For riders who want lightweight, durable, high-performance equipment, presta valves are the clear winner. For casual riders or anyone on a budget, Schrader valves work fine — they’re just increasingly rare on modern bikes.
How to Use a Presta Valve: Step-by-Step
Now for the practical part. Here’s how to pump air into a presta valve without any confusion.
Step 1: Locate your presta valve and look at the top. You’ll see a small locking nut below the valve cap. Unscrew this nut by hand until it’s loose — you don’t need to remove it entirely, just a few turns to break the seal.
Step 2: Remove the valve cap. Most presta valves come with a dust cap that threads onto the top. Set it aside somewhere safe; these caps are small and easy to lose.
Step 3: Press down gently on the center rod to confirm the valve opens. You might hear a small hiss of air — that’s a good sign, it means the valve is working.
Step 4: Attach your bike pump. Most modern pumps have a reversible head that works with both presta and Schrader valves. If yours doesn’t, you’ll need a presta-specific pump or an adapter. Push the pump head onto the valve firmly until it clicks or seats snugly — you should feel it lock on.
Step 5: Pump air into your tire, watching your pressure gauge if your pump has one. For road bikes, you’re usually aiming for 80–130 PSI depending on your tire and weight. For mountain bikes with presta valves, it’s typically 30–50 PSI.
Step 6: Remove the pump by unclipping or untwisting the head, depending on your pump type.
Step 7: Screw the locking nut back down, turning it clockwise until it’s snug against the base of the valve. Don’t over-tighten — you’ll strip the threads.
Step 8: Replace the valve cap by threading it back on.
That’s the whole process. Once you’ve done it a few times, it takes about 30 seconds.
Common Presta Valve Problems and How to Fix Them
Even with the best intentions, things go wrong sometimes. Here are the issues you’re most likely to run into.
Pump Won’t Attach
If your pump won’t connect to your presta valve, the culprit is almost always a forgotten step — you didn’t unscrew the locking nut at the top of the valve. That nut keeps the valve sealed, and your pump can’t override it. Loosen it, try again, and your pump should seat properly.
If it still won’t attach, you might be trying to fit a Schrader pump onto a presta valve. Check your pump head — presta pumps are narrower. If yours is built for Schrader valves, you’ll need a converter or a different pump entirely.
Air Leaks Around the Pump Head
You’ve attached the pump, but air is hissing out around the connection instead of going into the tire. This usually means the pump head isn’t seated fully. Disconnect and try again, pushing harder to get a tight seal.
If this keeps happening, your valve stem might be bent or damaged. Bent stems prevent a tight seal, and at that point, you’ll need to replace the valve or the inner tube.
Valve Cap Is Stuck or Missing
Presta valve caps sometimes get cross-threaded or stuck if they’re screwed on too aggressively. If it’s stuck, try wrapping the cap in a cloth for grip and gently rotating it counterclockwise. Don’t force it — you’ll damage the threads.
If you’ve lost a cap, replacements are inexpensive and universal, and typically come in multi-packs.
Tire Loses Air Overnight
You pumped your tire to the correct pressure, but by the next day, it’s half flat. This happens with presta valves, and it usually means the locking nut wasn’t screwed down all the way. The valve can’t seal properly without it.
Make sure the nut is snug after pumping — but don’t over-tighten it, since that can damage the threads or crack the valve stem.
What Does a Presta Pump Look Like?
A presta pump is any pump designed to work with presta valves. Some pumps are reversible and work with both presta and Schrader valves; others are presta-only.
A dedicated presta pump head is narrower and longer than a Schrader head. It typically has a removable collar or clip that tightens around the valve to hold it in place. Some pumps use a push-on design; others screw directly onto the valve.
Look for pumps marketed as “universal” if you want flexibility — they have changeable heads or reversible mechanisms so you can switch between valve types. They cost a little more, but they’re incredibly useful if you own multiple bikes.
Hand pumps, floor pumps, and electric pumps all come in presta-compatible versions. For home use, a floor pump with a gauge is the most practical choice. For on-the-road repairs, a compact hand pump fits easily in a jersey pocket or backpack.
Presta Valve Maintenance and Care
Presta valves are durable, but they still need basic maintenance to keep working properly.
Check your valve regularly for dirt or debris. The valve stem can collect grime, especially if you’re riding in muddy conditions — wiping it clean with a dry cloth occasionally is usually enough.
Avoid over-tightening the locking nut. It should be snug, not cranked down with all your strength. Over-tightening wears out the threads or can crack the valve stem, and then you’re looking at replacing your inner tube or tire entirely.
If your valve starts leaking after months of use, it might be time to replace the inner tube. The valve itself can wear out, but more often it’s the rubber around the valve stem that degrades. A new tube usually costs under $20 and solves the problem.
Never spray your valve with water or lubricant. Water can corrode the spring mechanism inside, and oil just attracts dirt. If your valve gets wet, dry it off with a cloth instead.
When Should You Use Presta Valves?
Presta valves come standard on most road bikes, premium gravel bikes, and high-end mountain bikes. If you’re buying a new bike in any of these categories, you’ll almost certainly have presta valves.
You might also choose presta valves if you’re building a custom bike or replacing inner tubes yourself. They’re the lighter, more precise option, and they perform better at high pressures than Schrader valves.
If you ride casually on a hardtail mountain bike or hybrid, your bike might have Schrader valves, and that’s perfectly fine — they’re simple and familiar. But if performance matters to you, or you want your tires to hold pressure longer, presta valves are worth the minor learning curve.
Frequently Asked Questions About Presta Valves
Can I use a regular pump on a presta valve?
Not without an adapter. Regular Schrader pumps won’t fit the narrow presta stem. You’ll need a presta-compatible pump, or a universal pump that works with both valve types. Many bike shops sell affordable adapters if you already own a Schrader pump.
How often should I check my presta valve pressure?
Check your tire pressure weekly if you ride regularly. Presta valves hold pressure well, but all tires lose a bit of air over time. Weekly checks keep you riding at the correct pressure, which improves performance and reduces the risk of flats.
What’s the correct pressure for a presta valve?
It depends on your bike and tire. Road bike tires usually run 80–130 PSI, while mountain bikes typically run 30–50 PSI. Check the sidewall of your tire for the manufacturer’s recommended range, and stay within it.
Can I convert a presta valve to a Schrader valve?
You can’t convert the valve itself, but you can replace the inner tube with one that has a Schrader valve. That said, your rim hole might be too small for a Schrader valve if it was drilled for presta. Drilling out the rim to fit a larger valve isn’t something most home mechanics should attempt.
Why does my pump keep popping off the presta valve?
The pump head isn’t seated securely. Make sure you’re pushing it straight onto the valve and locking it in place. If your pump uses a clip, tighten it fully. If it screws on, screw it all the way down.
Do presta valves need the locking nut?
Yes. The locking nut is part of the sealing mechanism, and without it screwed down, your valve can’t hold air properly. Always screw it back down after pumping.
How long do presta valves last?
Years, if you take care of them. The valve itself is metal and durable — what usually wears out is the rubber inner tube around the valve stem. A well-maintained presta valve can outlast multiple inner tubes.
Master Your Presta Valve and Ride Confidently
Presta valves aren’t complicated once you understand the mechanism. They’re designed to be lighter, more precise, and more reliable than Schrader valves, which is exactly why they’re the standard on performance bikes. The key is remembering to unscrew the locking nut before pumping, making sure you get a tight seal with your pump, and screwing the nut back down afterward.
Once these steps become habit, you’ll stop thinking about your presta valve altogether. You’ll pump your tires in 30 seconds and get on with your ride — and that’s really the point. Good equipment should disappear into the background and just work. Grab your pump, practice on your bike, and let the process become muscle memory. After a few tries, it’ll feel as natural as shifting gears.